How to post images
You have two options for adding images to your post. You can upload them to this site and include them in your posts or you can reference images you have hosted elsewhere such as imageshack.
This is Part 1 of 2 and will cover uploading images to this site.
There is a limit to the size of images that can be uploaded to this site. As of this writing that limit is 300 kbytes. Most digital cameras produce raw images that are larger than that so you might need to use a graphics program to reduce the size of your images. This tutorial does not cover that process.
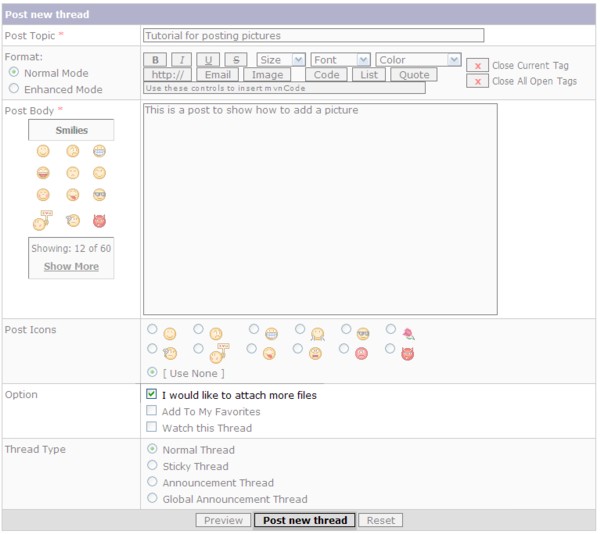
1. When you are writing a post you use the 'attach files' feature to add pictures. When your text is complete and you are ready to post, check the "I would like to attach more files" checkbox. Then click "Post new thread."

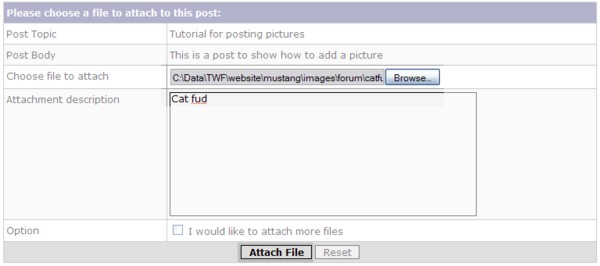
2. This will bring you to a page where you attach your file (picture).

On this page use the Browse button to locate the file on your computer. Once you locate the file the file name will appear in the box to the left of the Browse button. You can then add a textual description of your file. This description is optional.
3. At this point if you want to add more than one attachment you can again check the "I would like to attach more files" checkbox. If you do check the box, when you click Attach File you will go back to the attach file page where you will repeat the process for the second file (i.e. back to step 2). You can attach multiple files.
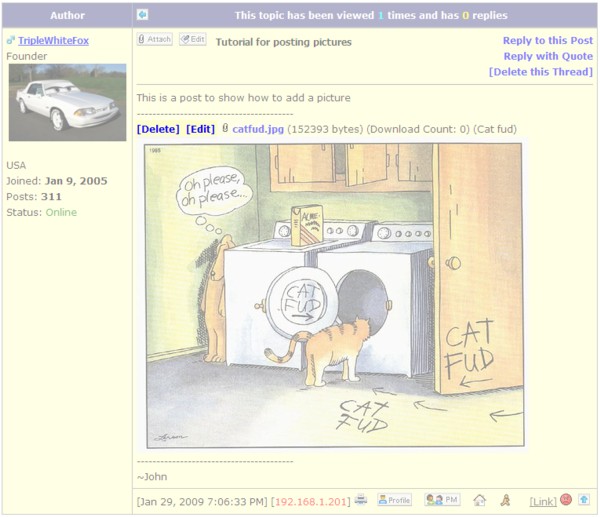
When you click the Attach File without having the "more files" checkbox checked you will go to your new post that will have the image(s) you attached.

4. For each attached file, you can use the [Delete] and [Edit] features to make changes after your post has been submitted. Edit allows you to change the description.
This is Part 1 of 2 and will cover uploading images to this site.
There is a limit to the size of images that can be uploaded to this site. As of this writing that limit is 300 kbytes. Most digital cameras produce raw images that are larger than that so you might need to use a graphics program to reduce the size of your images. This tutorial does not cover that process.
1. When you are writing a post you use the 'attach files' feature to add pictures. When your text is complete and you are ready to post, check the "I would like to attach more files" checkbox. Then click "Post new thread."

2. This will bring you to a page where you attach your file (picture).

On this page use the Browse button to locate the file on your computer. Once you locate the file the file name will appear in the box to the left of the Browse button. You can then add a textual description of your file. This description is optional.
3. At this point if you want to add more than one attachment you can again check the "I would like to attach more files" checkbox. If you do check the box, when you click Attach File you will go back to the attach file page where you will repeat the process for the second file (i.e. back to step 2). You can attach multiple files.
When you click the Attach File without having the "more files" checkbox checked you will go to your new post that will have the image(s) you attached.

4. For each attached file, you can use the [Delete] and [Edit] features to make changes after your post has been submitted. Edit allows you to change the description.


Comments
As you are creating your post you can add inline images hosted on a third party image hosting site such as imageshack . This is different from the 'attach files' method described in Part 1 where all files are displayed at the bottom of your post.
1. As you are editing your post, you can use the 'Image' button to add an image to where your cursor is located in the Post Body.
2. Clicking "Image" will bring up a dialog box where you enter the URL to your image.
Simply type it in or copy and paste it from your image host.
3. Once you click OK, your URL is wrapped in
Note that you can use the Preview button to get a better idea of how your post will appear to viewers. Also, you can add multiple images via this method. There is no practical limit. Each click of the Image button will add a new set of
I don't have much experience with imageshack and only signed up for it in order to write these tutorials. There are some things I have learned, though, that I should share:
1. ImageShack is helpful in that it will generate the code for you to add your images to various places including forums. It can do thumbnails and make them linkable to the full size image. Nice, but the nested tags (IMG within URL) that it creates does not work with this forum. Go with the Direct link that it generates for Full Size images.
2. In a similar vein, it can generate the code for just the Full Size image for forums and wrapped in
Thanks!
Ryan [B-)]
I love that color! Man, Royal Blue.. Where did you find that one?
At least she was ok! Thats the most important thing.
I love the GT Hatches, and if I didnt have the 1992, I would!